Quick Links
It takes no small amount of effort for playersto reach the Fortress of WindsinThe Legend of Zelda: The Minish Cap. Aside from acquiring a new sword, players also have to obtain the Pegasus Boots from Hyrule Castle Town. The Pegasus Boots allow players to safely navigate the Castor Wilds where the Fortress of Winds is located.
Of course, just finding the Fortress of Winds is just the start.The Minish Capplayers must overcome the difficult challenges within the Fortress of Winds if they want to get the third element. This walkthrough will show players how to complete the Fortress of Winds.
RELATED:The Legend of Zelda Fan Art Envisions Minish Cap Sequel
How to Get the Compass
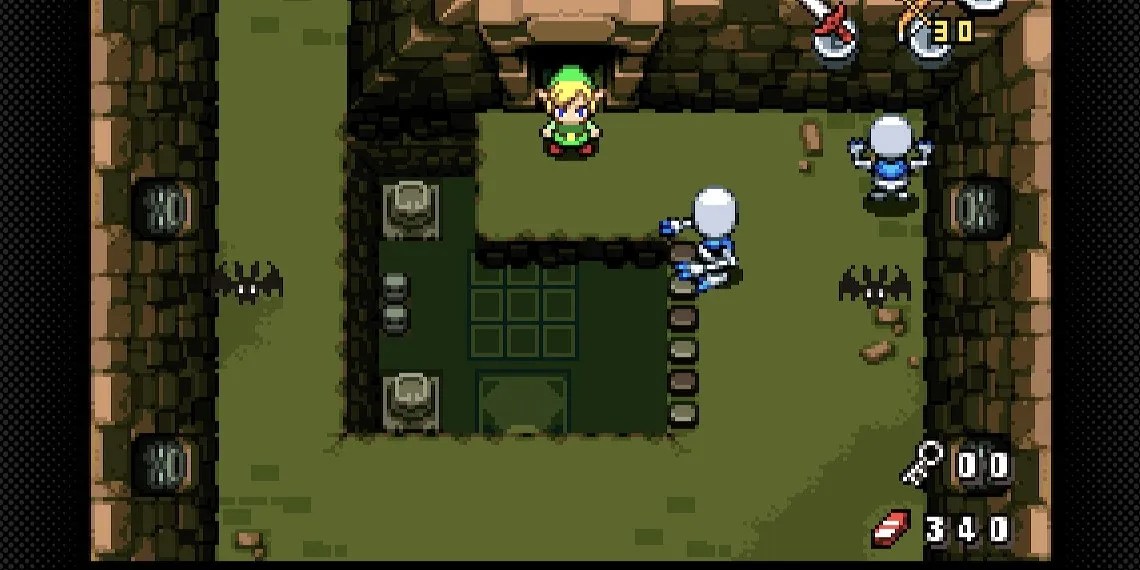
At the start of the dungeon, players will find four doors that they can go through. Three of these doors lead to another room with stairs that lead up. Go through the leftmost door and go upstairs. Be careful of the middle of this room, as it leads straight to the floor below. Go north and destroy the flying skulls that appear. Equip the bow and shoot the eye pattern on the wall to open the door next to it.
Upon entering this room, players will be attacked by four jumping skeletons. Kill them and go through the door that leads down. In this next area there is a collection of Rupees, but be careful asone of them is a Like Like. Further to the right in this room is a Like Like that uses a red Rupee as a lure. Kill it and claim the easy money.

Go up the ladder to enter a new area. Shoot the eyes on the wall to open the door and go through it. In this next room, stand on one of the glowing squares and charge the sword spin attack. Stand on the two switches to bring the statues in this room to life. Destroy these statues by shooting arrows into their eye and then open the chest that appears to obtain the compass.
How to Get the Dungeon Map
Go back to the room with the moving platforms and the eyes on the walls. Go to the right and open the door on this side by shooting arrows into the eyes. In this next room is a set of glowing squares. Use them to create a clone and push the large block to the right to access the other side of the room.
Push the other block to the left and then use the glowing squares to make another clone to continue pushing the first large block up. Pull the lever and a key will fall all the way down to the bottom floor. Jump down the hole to grab the small key. Return to the first room with the four doorways. Go through the door to the right of the leftmost door. Go up the stairs and destroy one of the statues blocking the way forward.

Once one of the statues have been destroyed, go up toward the steps and open the large chest toobtain the dungeon map. At the northmost edge of this room, there are two locked doors. At this point, players will only have one small key to use. Use the small key on the right door.
RELATED:The Legend of Zelda: The Minish Cap Is the Perfect Choice For a New Remake

In the next room, equip the Pegasus Boots and pull the handle as far back as possible to make a bridge appear. Quickly run across the bridge with the Pegasus Boots as the bridge will slowly begin to disappear. Go up the stairs to the right to enter another room. Kill the floating hand enemies to make a shrinking pedestal appear, but ignore it for now. Go into the next room and go down and around to reach an area with glowing pedestals. Carefully navigate between the rolling spike pins to reach the side of the room with glowing pedestals and four switches.
Try to avoid being grabbed by the hands, they will take players back to the start of the dungeon.

How to Get More Small Keys
to solve this puzzle, move the two statues onto the upper left and lower right switches. Next, charge the sword attack on the glowing platform on the north edge of the wall and then release the attack when standing on the bottom glowing panel on the left side. Carefully navigate down to prevent the clone from despawning and stand on both switches to make a second small key appear.
Use the key to open the door that is on the south side of this room. Kill the hand enemies in this next area and jump down to return to the area where players unlocked the right door. While there are other places that players can go in this area, they can’t do anything as they cannot get past all the rock walls. Go down to the starting area again.

Go the doorway that is left of the rightmost doorway and go up the stairs. Move toward the chest on the left, but watch out for the skeleton and the little sparking ball that moves around the room. Pull the lever on the left side of the room to open the door. In the next room, climb up the ladder to enter another area and go north. Destroy the statue that is standing on one of the glowing platforms on the left side of the room.
Stand on this glowing platform, start charging a spin attack, and then move on to the right most glowing square while holding it. Have the two clones step on the switches on the right side of the room and go through the door. Use the shrink pedestal and go back to the room where the glowing platforms are. Go inside the inactive statue and strike the switch.

Next, go through the narrow gap and return to normal size. Destroy the statue and then pull the lever that was behind it to make another small key fall to the bottom floor. Fall all the way down to the bottom to retrieve the key. Return to the room with the two locked doors and use the small key to open the door to the left. Step onto the moving platform and carefully dodge the blocks along the way.
RELATED:The Legend of Zelda: The Minish Cap Should Get the Link’s Awakening Treatment

How to Get the Mole Mitts
In the next room, shoot the two eyes on the wall. While doing this, keep an eye out for a shadow on the ground. Another hand enemy will fall down and attempt to grab players. In the next room, the door will close and players will have to fight a Darknut. Stun him with bombs and then strike him to damage him. Repeat this three times to defeat him. A teleportation pad to the entrance of the dungeon will appear, but ignore it for now.
Go south into the next room and carefully move toward the switch on the right side. Step on it and then go through the door to the south. Place a bomb between the two skulls to find a hidden room. Open the chestto receive the Mole Mitts, which can be used to get through all the rock walls that have kept players out of certain parts of the dungeon. In order to use the Mole Mitts, equip them and then press the button to start making a tunnel through the rock walls. Make sure to loot the small chest in this room, as it contains 100 Rupees.

How to Find the Big Key
With the Mole Mitts, players can find all sorts of hidden items and chests containing Kinstone pieces throughout the dungeon. Return to the room with the two doors that had been locked and go south. Go up the ladder and then use the Mole Mitts to dig toward the doorway. Push the block in the upper right corner to the right to make another teleport pad appear. Thedoor to the bossis in this room, but players cannot open it without the Big Key. But they will now be able to teleport back here form the entrance.
Go back to the room with the shrinking pedestal that appeared after defeating the hand enemies. Shrink and then go down toward the door south of the spike covered rolling pins. Look for a small hole and go inside to find another shrinking pedestal. Go back to normal size and then step on the switch to make a key fall into one of the holes. Dig toward it but watch out for the electrified enemies. Leave this room and jump down to reach a shrinking pedestal.
Go south into a room that is mostly inaccessible due to the rock walls. Equip the Mole Mitts and get to work on making a tunnel south toward a ladder. Go north to reach a locked door and then open it with the small key. After opening the door, jump into the hole on the right to reach a chest that contains the Big Key. Return to the entrance and use the red portal to teleport directly to the door that leads to the boss.
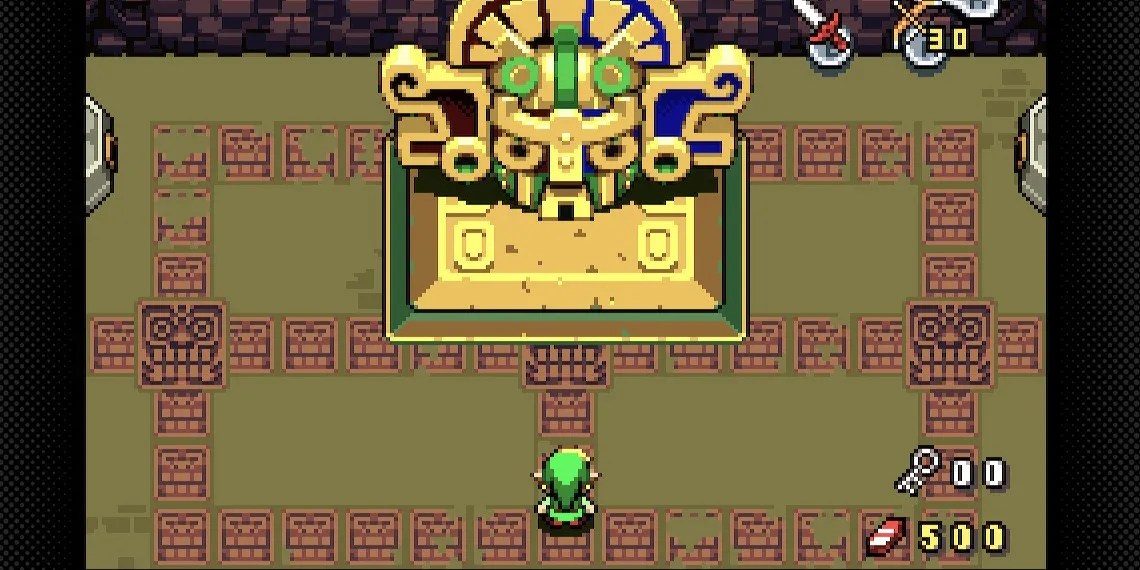
How to Beat Mazaal
As is almost tradition with somebosses inZeldagames, Mazaal has eyes on his hands. Shoot these eyes to stun the hands and then disable them by attacking them with the sword. While attacking one hand, the other will try to slam players and also periodically grab them. Once both hands have been destroyed, use one of the shrinking pedestals to shrink and then enter the boss’s head.
Inside the boss’s head, look for a pillar that has eyes on it. Attack this pillar and destroy it. Upon doing so, players will be forced out of the head. Return to normal size and go back to disabling the hands. This time inside the boss’s head, there will be rock walls blocking the way toward the pillars. Dig a hole and look for the pillar that has eyes. While disabling the boss’s hands for a third time, watch out for the laser beam shot by the boss. Upon destroying the third pillar, the boss will be defeated. Grab the Heart Container and enter the next room. Examine the pillar and thenpick up the Ocarinaof Wind.
Part 7 of this walkthrough is coming soon.
The Legend of Zelda: The Minish Capis available now on Game Boy Advance, Nintendo Switch Online + Expansion Pack, and the Wii U Virtual Console.
